Friday, January 18, 2019

打造一個多人串流系統 c#xffmpeg part5

打造一個 c# 多執行緒 server


,接續上篇標體寫得上古語言  沒錯  hls m3u8格式失敗了,原因呢,
flex 已經停止更新一段時間了,又這麼剛好我要傳輸的音頻 沒有解碼器,flex 又沒有寫好的aac encode,adobe media server 的 音頻無法 壓成 aac 規格 導致m3u8 影音格式無法解析,後來
在想了 要交叉編譯後果斷放棄,真的沒辦法了嗎,在公司積極的轉型真的沒辦法了嗎,沒錯土法煉鋼的時間又到了,大致上的做法就是,在client對server端口發送rtmp訊號,這個時候就開啟多執行緒去呼叫,沒想到 ffmpeg 竟然可以當作串流轉接器, 解決方案就是,先上傳至
rtmp再進行 encode 在配合 c# 編寫的 server 再轉推送去其他流 這樣就大功告成囉,效能的話恩恩,很明顯可以看到處理都是在伺服器做處理,至於..hls 實在不是適合用於 即時傳輸影像,過幾天再來研究一下http flv格式到底是怎麼一回事  ,或許應該嘗試其他media server囉?
using System;
using System.Collections.Generic;
using System.Diagnostics;
using System.Threading;
namespace ConsoleApp1
{
class Program
{
static String nProcessID;
static int count = 0;
public static void process_Exited(object sender, EventArgs e)
{
Console.WriteLine(nProcessID);
//Console.WriteLine(“exit”);
}
public static void call_process_ffmpeg(object name)
{
string thread_name = (string)name; //unboxing
Process process = new Process();
//Environment.GetEnvironmentVariable("WinDir") + "\\Notepad.exe";
// process.StartInfo.FileName = "C:\\ffmpeg\\bin\\ffmpeg.exe -re -i rtmp://localhost/live/myCamera -s 640x480 -vcodec copy -tune zerolatency - filter_complex aresample = 44100 - bufsize 1000 - c:a aac -b:a: 0 128k - f flv rtmp://localhost/livepkgr/livestream?adbe-live-event= liveevent";
ProcessStartInfo pinfo = new ProcessStartInfo("ffmpeg");
pinfo.Arguments = "-re -i rtmp://localhost/live/myCamera -r 30 -vcodec copy -tune zerolatency -filter_complex aresample=44100 -bufsize 1000 -c:a aac -b:a:0 128k -f flv rtmp://localhost/livepkgr/livestream?adbe-live-event=liveevent";
process.StartInfo = pinfo;
process.Start();
process.Exited += new EventHandler(process_Exited);
process.EnableRaisingEvents = true;
// process.WaitForInputIdle();
nProcessID = process.SessionId.ToString();
process.WaitForExit();
Console.WriteLine(thread_name + "exit");
}
static void Main(string[] args)
{
List<Thread> threads = new List<Thread>();
for (int i = 0; i < 10; i++)
{
Thread tmp = new Thread(new ParameterizedThreadStart(call_process_ffmpeg));
threads.Add(tmp);
}
int count = 0;
foreach (Thread tmp in threads)
{
tmp.Start(count.ToString());
count++;
}
//for (int i = 0; i < threads.)
//Thread test = new Thread( new ParameterizedThreadStart(call_process_ffmpeg));
//test.Start("test1");
//Thread test2 = new Thread(new ParameterizedThreadStart(call_process_ffmpeg));
//test2.Start("test2");
//Console.ReadLine();
}
}
}
view raw server.cs hosted with ❤ by GitHub

Sunday, January 13, 2019

打造一個多人串流系統 html5 publish to adobe media server ? part4


推送到了html5  瀏覽器又怎樣呢,我們的客戶端,假設也必須要,傳輸自己的畫面自server 怎麼辦呢?  找了一下子發現又有 solution 可以用了
https://github.com/chenxiaoqino/getusermedia-to-rtmp

Install ffmpeg


加入系統變數

c:\ffmpeg\bin

Cmd  >>>ffmpeg version

Install successful!

Node.js install 


一直下一步~
Cmd  >>> node -v


Clone github download getusermedia-to-rtmp


我們的主角


必須切去該路徑 然後 cmd 輸入 npm install


ffmpeg param setting


Path:

C:\Users\x2132\Desktop\nodejs\getusermedia-to-rtmp-master\server.js

ffmpeg 參數設定
var ops=[
'-i','-',
'-c:v', 'libx264', '-preset', 'veryfast', '-tune', 'zerolatency',
'-an', //TODO: give up audio for now...
//'-async', '1',
'-filter_complex', 'aresample=44100', //necessary for trunked streaming?
//'-strict', 'experimental', '-c:a', 'aac', '-b:a', '128k',
'-bufsize', '1000',
'-f', 'flv', socket._rtmpDestination
];
view raw Server.js hosted with ❤ by GitHub
run nodejs server!


node server.js

Html5 Rtmp server location


rtmp://127.0.0.1:1935/live/test
注意後面跟 flex 版本一樣必須要指定
確實收到數據了!
檢查 flex 端是否可以撥放 


成功! ,終於可以交貨了

Wednesday, January 9, 2019

打造一個多人串流系統 adobe media server f4m to HTTP Live Streaming(hls) part3


Adobe宣布Flash不再更新2020年全面停用,HTML5淘汰Flash成為多媒體網頁主流

Adobe宣布Flash不再更新2020年全面停用,HTML5淘汰Flash成為多媒體網頁主流 (比較,取代,2D動畫,多媒體,ActionScript,Safari,Firefox,Flash Player)

HTML5 出現之後,和 Flash 的比較、取代到淘汰的話題始終熱門。Flash 歷經 Macromedia 時代到 Adobe 時代,可以說是平面2D多媒體設計的主流軟體;然而,時至今日Flash 已經是走入末途,越來越多的開發公司表示不採用 Flash Player 與其相關技術,主流瀏覽器也陸續停止支援這個漏洞永遠補不完且很吃系統資源的舊技術。

自2016年 Google 表示最快該年底就會將 Chrome 瀏覽器預設停止支援與使用Flash後,2017年的現在,Adobe 都已經確定宣告 Flash 將走入歷史。

Adobe宣布Flash不再更新2020年全面停用,HTML5淘汰Flash成為多媒體網頁主流 (比較,取代,2D動畫,多媒體,ActionScript,Safari,Firefox,Flash Player)

綜合於上述原因我們來思考一下解決方案吧!

HTTP Live Streaming(hls)


HTTP Live Streaming(縮寫是HLS)是一個由蘋果公司提出的基於HTTP流媒體網絡傳輸協議。是蘋果公司QuickTime XiPhone軟體系統的一部分。它的工作原理是把整個流分成一個個小的基於HTTP的文件來下載,每次只下載一些。當媒體流正在播放時,客戶端可以選擇從許多不同的備用源中以不同的速率下載同樣的資源,允許流媒體會話適應不同的數據速率。在開始一個流媒體會話時,客戶端會下載一個包含元數據的extended M3U (m3u8) playlist文件,用於尋找可用的媒體流。
HLS只請求基本的HTTP報文,與實時傳輸協議(RTP)不同,HLS可以穿過任何允許HTTP數據通過的防火牆或者代理伺服器。它也很容易使用內容分發網絡來傳輸媒體流。
蘋果公司把HLS協議作為一個網際網路草案(逐步提交),在第一階段中已作為一個非正式的標準提交到IETF。2017年8月,RFC 8216發布,描述了HLS協議第7版的定義。

adobe media server to hls


恩恩看來新版adobe media server 有支援 hls 之間的轉換,就來看怎樣實現過程吧!

Flex to HTTP Live Streaming


使用html5進行撥放 ,並不支援原生撥放數據,所以必須再轉成hls 


http://localhost/hds-live/livepkgr/_definst_/liveevent/livestream.m3u8 


http://localhost/hds-live/livepkgr/_definst_/liveevent/livestream.f4m


使用html5進行撥放 ,並不支援原生撥放數據,所以必須再轉成hls


http://localhost/hds-live/livepkgr/_definst_/liveevent/livestream.m3u8

輸入範例
rtmp://localhost/livepkgr

livestream?adbe-live-event=liveevent

[name]? adbe-live-event=liveevent

Stream里面输入:livestream?adbe-live-event=liveevent 如果左边的Preset设置了多路,Stream就要修改为:livestream%i?adbe-live-event=liveevent


新建crossdomain.xml跨網域權限文件


目前設為最寬鬆
位置
C:\Program Files\Adobe\Adobe Media Server 5\webroot\crossdomain.xml

<?xml version="1.0"?>
<!-- http://www.osmf.org/crossdomain.xml -->
<!DOCTYPE cross-domain-policy SYSTEM "http://www.adobe.com/xml/dtds/cross-domain-policy.dtd">
<cross-domain-policy>
<allow-access-from domain="*" />
<site-control permitted-cross-domain-policies="all"/>
</cross-domain-policy>
view raw crossdomain.xml hosted with ❤ by GitHub


推送頻道範例


推送去123頻道成功會在
C:\Program Files\Adobe\Adobe Media Server5\applications\livepkgr\streams\_definst_ 
產生該頻道資料夾


注意端口 ,和url文件位置與檔案格式

http://172.16.2.111:8134/hds-live/livepkgr/_definst_/liveevent/livestream.f4m


http://172.16.2.111:8134/hls-live/livepkgr/_definst_/liveevent/livestream.m3u8

檢測是否成功推送可以鍵入此連結
http://172.16.2.111:8134/hds-live/livepkgr/_definst_/liveevent/livestream.f4m


多路推送 品質修改 (尚未研究)


(好像是自動適應,依網路速度自行切換吧?
C:\Program Files\Adobe\Adobe Media Server 5\applications\livepkgr\events\_definst_\liveevent\ Manifest.xml


Html5使用hls.js 撥放器,撥放m3u8串流


adobe  media server  to hls !
<script src="https://cdn.jsdelivr.net/npm/hls.js@latest"></script>
<!-- Or if you want a more recent canary version -->
<!-- <script src="https://cdn.jsdelivr.net/npm/hls.js@canary"></script> -->
<video id="video" muted="muted"></video>
<script>
var video = document.getElementById('video');
if(Hls.isSupported()) {
var hls = new Hls();
hls.loadSource('/hls-live/livepkgr/_definst_/liveevent/livestream.m3u8');
hls.attachMedia(video);
hls.on(Hls.Events.MANIFEST_PARSED,function() {
video.play();
});
}
// hls.js is not supported on platforms that do not have Media Source Extensions (MSE) enabled.
// When the browser has built-in HLS support (check using `canPlayType`), we can provide an HLS manifest (i.e. .m3u8 URL) directly to the video element throught the `src` property.
// This is using the built-in support of the plain video element, without using hls.js.
// Note: it would be more normal to wait on the 'canplay' event below however on Safari (where you are most likely to find built-in HLS support) the video.src URL must be on the user-driven
// white-list before a 'canplay' event will be emitted; the last video event that can be reliably listened-for when the URL is not on the white-list is 'loadedmetadata'.
else if (video.canPlayType('application/vnd.apple.mpegurl')) {
video.src = '/hls-live/livepkgr/_definst_/liveevent/livestream.m3u8';
video.addEventListener('loadedmetadata',function() {
video.play();
});
}
</script>
view raw index.html hosted with ❤ by GitHub

Sunday, January 6, 2019

打造一個多人串流系統 adobe_media_server part2


RTMFP VS RTMP


什么是RTMFP?
RTMFP 是 Real‐Time Media Flow Protocol的缩写,是Adobe准备推出的一种新的通信协议,这种通信协议可以让 Flash 客户端直接和另外一个Flash 客户端之间进行数据通信,也就是常说的p2p的方式进行通信。
什么时候能用上RTMFP?需要什么技术支持?
只有下一个版本的播放器:Flash Player10 才支持RTMFP 协议,同时服务器端还需要下一个版本的 Flash Media Server,估计就是FMS4了,(我博客之前的一篇文章:http://www.cuplayer.com/index.php?play=reply&id=115没猜错)。
目前虽然Flash Player10的预览版本已经出来了,但是FMS4发布日期还没有定下来。所以目前RTMFP还体验不了。
RTMFP有哪些新的功能?
使用RTMFP,一些使用即时通讯技术的Flash应用,例如在线聊天,在线多人游戏等应用的通信效率将会大大提高,因为RTMFP支持客户端之间直接通信,包括麦克风、摄像头的共享等。(目前Flash客户端之间的通信都是要先经过服务器中转的,所以效率不高,服务器压力比较大,RTMFP技术出现后这些问题将会迎刃而解)。
不过RTMFP不支持文件的传输和共享。
RTMFP给我们带来什么好处?
RTMFP将会大大地减少音视频直播、点播、多人在线游戏等应用的网络带宽的消耗,减轻服务器的负担。因为很多数据都是客户端之间直接传输了,无须再经过服务器中转了。
RTMFP由于使用了UDP网络协议,所以相对之前的TCP协议在数据传输效率上也会大大提高,这种优势在音视频数据传输方面是非常明显的。
关于TCP和UDP网络通信协议之间的区别以及各自的优缺点大家可以去网上搜索相关的介绍,这里就不再做过多的介绍了。
RTMFP和RTMP有哪些区别?
从本质上的区别就是网络通信的协议不一样,RTMFP是使用User Datagram Protocol (UDP)协议,而RTMP是使用Transmission Control Protocol (TCP)协议。
UDP协议对比TCP协议最大的优点就是传输流媒体数据的时候效率非常高,网络延迟少,增强音视频的传输质量,以及网络连接的可靠性增强。
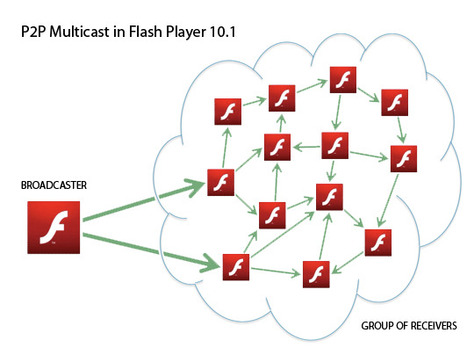
RTMP的客户端之间要进行数据通信,必须先将数据发送到FMS等服务器端,然后服务器端再转发到另外一个用户,而RTMFP则支持客户端直接发送数据到另外一个客户端,无需经过服务器的中转。此时你也许会问,居然客户端之间的数据可以之间通信,还要FMS服务器做什么?其实此时的FMS服务器只起到桥梁作用,因为客户端之间要创建通信会话就必须要知道对方客户端的相关信息,就相当于你找对象要先经过媒婆介绍一样的道理,哈哈
下面的示意图表现了RTMFP和RTMP的不同之处:
RTMFP适合用于哪些类型的应用?
RTMFP比较适合用于网络通信数据量比较大,通信即时性要求比较强的应用,例如VoIP,音视频即时沟通工具(IM),多人网络游戏等等。
Adobe以后还会丰富RTMFP相关技术吗?
会的,Adobe以后还会一如既往地对RTMFP进行进一步增强、优化以适合市场发展的需求,不过目前还没有进一步的相关声明。

推送去有支援rtmp的mediaserver,不過延遲的問題可能要考慮到buffertime

打造一個多人視訊系統 


請注意參數設定的
ams.ini Application.xml terminal
這關係到應用程式是否能正常運行,上述檔案有關檔案是否有權限。

###########################################################################
# ams.ini contains substitution variables for Adobe Media Server #
# configuration files. Lines beginning with '#' are considered comments. #
# A substitution variable is in the form <name>=<value>. Everything up to #
# the first '=' is considered the name of the substitution variable, and #
# everything after the first '=' is considered the substitution value. If #
# you want a substitution variable to have leading or trailing spaces, #
# enclose the value around double quotes. For example, foo=" bar " #
###########################################################################
###############################################################
# This section contains configurable parameters in Server.xml #
###############################################################
# Username for server admin
# For example:
# SERVER.ADMIN_USERNAME = foo
#
SERVER.ADMIN_USERNAME = x213212
# IP address and port Adobe Media Admin Server should listen on
# For example:
# SERVER.ADMINSERVER_HOSTPORT = :1111
#
SERVER.ADMINSERVER_HOSTPORT = :1111
# User id in which to run the process (Linux Only)
# For example:
# SERVER.PROCESS_UID = 500
#
SERVER.PROCESS_UID =
# Group id in which to run the process (Linux Only)
# For example:
# SERVER.PROCESS_GID = 500
#
SERVER.PROCESS_GID =
# License key for Adobe Media Server
# For example:
# SERVER.LICENSEINFO = XXXX-XXXX-XXXX-XXXX-XXXX-XXXX
#
SERVER.LICENSEINFO = 1652-5580-8001-8333-2201-1631
# LIVE_DIR denotes the full path of sample "Live" application's
# folder for storing any live stream recorded by server.
# For example:
# LIVE_DIR = <AMS_Installation_Dir>\applications\live
#
LIVE_DIR = C:\Program Files\Adobe\Adobe Media Server 5\applications\live
ROOM_DIR = C:\Program Files\Adobe\Adobe Media Server 5\applications\room <----------------------------------------------------------
# VOD_COMMON_DIR denotes the full path of sample "VOD" application's
# folder for storing onDemand and Progressive Download .flv/.mp3 files.
# File stored in this folder can be streamed and are also PD-able.
# Note : If you are using the default installation of Apache as a webserver,
# and if you modify VOD_COMMON_DIR, please change the document root
# accordingly in httpd.conf.
# For example:
# VOD_COMMON_DIR = <AMS_Installation_Dir>\webroot\vod
#
VOD_COMMON_DIR = C:\Program Files\Adobe\Adobe Media Server 5\webroot\vod
# VOD_DIR denotes the full path of sample "VOD" application's
# folder for storing onDemand only .flv/.mp3 files. Files stored in
# this folder are not PD-able
# For example:
# VOD_DIR = <AMS_Installation_Dir>\applications\vod\media
#
VOD_DIR = C:\Program Files\Adobe\Adobe Media Server 5\applications\vod\media
# The maximum size of the FLV cache, in megabytes.
# The default is 500MB.
#
SERVER.FLVCACHE_MAXSIZE=500
# Whether to start and stop the included HTTP server along
# with AMS.
#
SERVER.HTTPD_ENABLED = true
# Whether to start and stop the cache cleaning tool along
# with HTTP server.
#
SERVER.HTCACHECLEAN_ENABLED = true
# The path specifying the cache root for webserver caching - this path is passed on to htcacheclean which periodically cleans cache files stored in this location.
# Note: Make sure that the same cache root path is also specified for Apache httpd using the CacheRoot directive in httpd.conf
SERVER.HTCACHEROOT = C:\Program Files\Adobe\Adobe Media Server 5\Apache2.4\cacheroot
################################################################
# This section contains configurable parameters in Adaptor.xml #
################################################################
# IP address and port(s) Adobe Media Server should listen on
# For example:
# ADAPTOR.HOSTPORT = :1935,80
#
ADAPTOR.HOSTPORT = :1935
# IP (address and) port that Adobe Media Server should proxy
# unknown HTTP requests to. Leave empty to disable proxying.
# With no address, specifies a localhost port.
# For example:
# HTTPPROXY.HOST = webfarm.example.com:80
#
HTTPPROXY.HOST = :8134
#This tag specifies an IP address for the player to use instead of a hostname when
#making the RTMPT connection to AMS. If nothing is specified, AMS will automatically
#determine the IP to use.
#
ADAPTOR.HTTPIDENT2 =
##############################################################
# This section contains configurable parameters in Vhost.xml #
##############################################################
# Application directory for the virtual host
# For example:
# VHOST.APPSDIR = C:\myapps
#
VHOST.APPSDIR = C:\Program Files\Adobe\Adobe Media Server 5\applications
####################################################################
# This section contains configurable parameters in Application.xml #
####################################################################
# List of semi-colon delimited paths in which to search for script to load
# For example:
# APP.JS_SCRIPTLIBPATH = C:\scripts;C:\Program Files\Foo\scripts
#
APP.JS_SCRIPTLIBPATH = C:\Program Files\Adobe\Adobe Media Server 5\scriptlib
###############################################################
# This section contains configurable parameters in Logger.xml #
###############################################################
LOGGER.LOGDIR =
####################################################################
# This section contains configurable parameters in Users.xml #
####################################################################
# Enable or disable using HTTP requests to execute admin commands.
# Set to "true" to enable, otherwise it will be disabled. The
# actual commands permitted for server admin and virtual host admin
# users can be set in Users.xml.
USERS.HTTPCOMMAND_ALLOW = true
view raw ams.ini hosted with ❤ by GitHub
<Application>
<StreamManager>
<VirtualDirectory>
<!-- Specifies application specific virtual directory mapping for streams. -->
<Streams>/;${ROOM_DIR}</Streams>
</VirtualDirectory>
<StreamRecord override="yes">true</StreamRecord>
</StreamManager>
<SharedObjManager>
<ClientAccess override="yes">true</ClientAccess>
</SharedObjManager>
</Application>
view raw Application.xml hosted with ❤ by GitHub
application.onAppStart = function() {
trace("onAppStart");
};
//新客户端连接时触发
application.onConnect = function(client, uName) {
trace("onConnect = "+uName);
client.UserName = uName;
application.acceptConnection(client);//允许客户登录,如果要对客户身份做验证,在此扩展即可
hellomsg="system message"+client.UserName+" 進入房間";
application.broadcastMsg("showmsg",hellomsg);//调用所有client的showmsg方法,并传递参数hellomsg(客户端的代码中,必须有对应的showmsg函数)
//定义服务端的sendmsg方法,以便客户端能调用
client.sendmsg = function(msg) {
mesg = client.UserName+": "+msg;
//每次client调用本方法后,服务器同步广播到所有client
application.broadcastMsg("showmsg",mesg)
};
};
//有客户端断开连接时触发
application.onDisconnect = function(client) {
trace("onDisconnect ="+client.UserName);
hellomsg="system message"+client.UserName+" 離開房間";
application.broadcastMsg("showmsg",hellomsg)
};
application.onAppStop = function() {
trace("onAppStop");
};
view raw main.asc hosted with ❤ by GitHub
"C:\Program Files\Adobe\Adobe Media Server 5\tools\far.exe" -package -archive main -files Application.xml main.asc
編譯 far檔案
需要再hosts檔案最下面插入127.0.0.1 activate.adobe.com 這樣伺服器才抓的到 asc檔案
C:\Windows\System32\drivers\etc\hosts
# Copyright (c) 1993-2009 Microsoft Corp.
#
# This is a sample HOSTS file used by Microsoft TCP/IP for Windows.
#
# This file contains the mappings of IP addresses to host names. Each
# entry should be kept on an individual line. The IP address should
# be placed in the first column followed by the corresponding host name.
# The IP address and the host name should be separated by at least one
# space.
#
# Additionally, comments (such as these) may be inserted on individual
# lines or following the machine name denoted by a '#' symbol.
#
# For example:
#
# 102.54.94.97 rhino.acme.com # source server
# 38.25.63.10 x.acme.com # x client host
# localhost name resolution is handled within DNS itself.
# 127.0.0.1 localhost
# ::1 localhost
127.0.0.1 activate.adobe.com
view raw terminal hosted with ❤ by GitHub
<?xml version="1.0" encoding="utf-8"?>
<s:Application xmlns:fx="http://ns.adobe.com/mxml/2009"
xmlns:s="library://ns.adobe.com/flex/spark"
xmlns:mx="library://ns.adobe.com/flex/mx"
creationComplete="windowedapplication1_creationCompleteHandler(event)">
<fx:Declarations>
<!-- Place non-visual elements (e.g., services, value objects) here -->
</fx:Declarations>
<fx:Script>
<![CDATA[
import flash.display.MovieClip;
import flash.events.NetStatusEvent;
import flash.media.Camera;
import flash.media.Microphone;
import flash.media.Video;
import flash.net.NetConnection;
import flash.net.NetStream;
import mx.charts.CategoryAxis;
import mx.collections.ArrayCollection;
import mx.controls.Alert;
import mx.core.UIComponent;
import mx.events.FlexEvent;
var nc:NetConnection;
var nc2:NetConnection;
var ns:NetStream;
var nsPlayer:NetStream;
var vid:Video;
var vidPlayer:Video;
var cam:Camera;
var mic:Microphone;
var talk_so:SharedObject;
var screen_w:int=320;
var screen_h:int=240;
var now_people:Number;
[Bindable]
var ready:Boolean;
var media_server:Boolean;
var shareObject_server:Boolean;
protected function windowedapplication1_creationCompleteHandler(event:FlexEvent):void
{
publish.enabled=false;
send_shareobject.enabled=false;
}
public function onBWDone():void {
trace("11");
}
public function onBWDone2():void {
trace("11");
}
private function onNetStatus(event:NetStatusEvent):void{
trace(event.info.code);
if(event.info.code == "NetConnection.Connect.Success"){
//
publish.enabled=true;
}
else
{
trace ("連接失敗"+event.info.code);
}
}
private function netStatusHandler(evt:NetStatusEvent):void
{
trace(evt.info.code); //调试代码用
if ( evt.info.code =="NetConnection.Connect.Success" )
{
// nc2.client ={ onBWDone: function():void{} };
// talk_so = SharedObject.getRemote("talk",nc2.uri,true);
//
// trace(nc2.uri)
// talk_so.addEventListener(SyncEvent.SYNC,talkSoSyncHandler);
// talk_so.connect(nc2);
//talk_so.fps=0.1;
talk_so = SharedObject.getRemote("userList",nc2.uri,false);
talk_so.connect(nc2);
talk_so.addEventListener(SyncEvent.SYNC,talkSoSyncHandler);
send_shareobject.enabled=true;
trace ("連接房間成功!");
}
else
{
trace ("連接不到房間!");
}
}
private function publishCamera( publish_name:String,play_type:String)
{
//Cam
try{
cam = Camera.getCamera();
cam.setMode(640, 480,60);
/**
* public function setKeyFrameInterval(keyFrameInterval:int):void
* The number of video frames transmitted in full (called keyframes) instead of being interpolated by the video compression algorithm.
* The default value is 15, which means that every 15th frame is a keyframe. A value of 1 means that every frame is a keyframe.
* The allowed values are 1 through 300.
*/
cam.setKeyFrameInterval(1);
/**
* public function setQuality(bandwidth:int, quality:int):void
* bandwidth:int — Specifies the maximum amount of bandwidth that the current outgoing video feed can use, in bytes per second (bps).
* To specify that the video can use as much bandwidth as needed to maintain the value of quality, pass 0 for bandwidth.
* The default value is 16384.
* quality:int — An integer that specifies the required level of picture quality, as determined by the amount of compression
* being applied to each video frame. Acceptable values range from 1 (lowest quality, maximum compression) to 100
* (highest quality, no compression). To specify that picture quality can vary as needed to avoid exceeding bandwidth,
* pass 0 for quality.
*/
cam.setQuality(0,100);
/**
* public function setProfileLevel(profile:String, level:String):void
* Set profile and level for video encoding.
* Possible values for profile are H264Profile.BASELINE and H264Profile.MAIN. Default value is H264Profile.BASELINE.
* Other values are ignored and results in an error.
* Supported levels are 1, 1b, 1.1, 1.2, 1.3, 2, 2.1, 2.2, 3, 3.1, 3.2, 4, 4.1, 4.2, 5, and 5.1.
* Level may be increased if required by resolution and frame rate.
*/
//var h264setting:H264VideoStreamSettings = new H264VideoStreamSettings();
// h264setting.setProfileLevel(H264Profile.MAIN, 4);
//Mic
mic = Microphone.getMicrophone();
/*
* The encoded speech quality when using the Speex codec. Possible values are from 0 to 10. The default value is 6.
* Higher numbers represent higher quality but require more bandwidth, as shown in the following table.
* The bit rate values that are listed represent net bit rates and do not include packetization overhead.
* ------------------------------------------
* Quality value | Required bit rate (kbps)
*-------------------------------------------
* 0 | 3.95
* 1 | 5.75
* 2 | 7.75
* 3 | 9.80
* 4 | 12.8
* 5 | 16.8
* 6 | 20.6
* 7 | 23.8
* 8 | 27.8
* 9 | 34.2
* 10 | 42.2
*-------------------------------------------
*/
mic.encodeQuality = 9;
/* The rate at which the microphone is capturing sound, in kHz. Acceptable values are 5, 8, 11, 22, and 44. The default value is 8 kHz
* if your sound capture device supports this value. Otherwise, the default value is the next available capture level above 8 kHz that
* your sound capture device supports, usually 11 kHz.
*
*/
mic.rate = 44;
ns = new NetStream(nc);
//H.264 Setting
//ns.videoStreamSettings = h264setting;
ns.attachCamera(cam);
ns.attachAudio(mic);
ns.publish(publish_name, play_type);
}
catch(error:Error)
{
cam=null;
trace ("找不到視訊鏡頭");
return ;
}
/**
* public function setMode(width:int, height:int, fps:Number, favorArea:Boolean = true):void
* width:int — The requested capture width, in pixels. The default value is 160.
* height:int — The requested capture height, in pixels. The default value is 120.
* fps:Number — The requested capture frame rate, in frames per second. The default value is 15.
*/
}
private function displayPublishingVideo():void {
trace ("開始撥放當前視訊鏡頭");
if(cam != null){
vid = new Video(screen_w, screen_h);
// vid.x = 10;
// vid.y = 10;
vid.attachCamera(cam);
var tmp:UIComponent = new UIComponent();
tmp.addChild(vid);
canvas.addElement(tmp);
}
}
private function displayPlaybackVideo(publish_name:String):void{
trace ("開始撥放返回數據流");
nsPlayer = new NetStream(nc);
nsPlayer.bufferTime = 0.1;
nsPlayer.play(publish_name);
vidPlayer = new Video(screen_w, screen_h);
// vidPlayer.x = screen_w + 20;
// vidPlayer.y = 10;
//
vidPlayer.attachNetStream(nsPlayer);
var tmp:UIComponent = new UIComponent();
tmp.addChild(vidPlayer);
canvas2.addElement(tmp);
}
protected function publish_clickHandler(event:MouseEvent):void
{
// TODO Auto-generated method stub
trace ("開始推送數據流");
publishCamera(publish_name.text,publish_type.text);
displayPlaybackVideo(getback_name.text);
displayPublishingVideo();
}
protected function connection_clickHandler(event:MouseEvent):void
{
// TODO Auto-generated method stub
try{
nc = new NetConnection();
nc.addEventListener(NetStatusEvent.NET_STATUS, onNetStatus);
nc.connect(publish_address.text);
nc.client ={ onBWDone: function():void{} };
// TODO Auto-generated method stub
nc2 = new NetConnection();
nc2.addEventListener(NetStatusEvent.NET_STATUS, netStatusHandler);
nc2.connect(shareObject_address.text,shareObject_name.text);
nc2.client ={ onBWDone: function():void{} };
nc2.client.showmsg = function (str:String):void
{
msg.text=msg.text+str+"\n";
};
}
catch(error:Error)
{
trace (error.message);
}
}
protected function disconnection(event:MouseEvent):void
{
// TODO Auto-generated method stub
nc.close();
nc2.close();
nc=null;
nc=null;
}
protected function send_shareobject_clickHandler(event:MouseEvent):void
{
// TODO Auto-generated method stub
nc2.call("sendmsg",null,shareObject_msg.text);
// var arr:ArrayCollection = new ArrayCollection();
//
//
//
// if ( talk_so.data.msgList==null )
// {
// arr = new ArrayCollection();
// }
// else
// {
// convertArrayCollection(arr,talk_so.data.msgList as ArrayCollection);
// }
//
// var obj:message = new message();
// obj.nickname="x213212";
// obj.msg=shareObject_msg.text;
// obj.time = new Date();
//
// arr.addItem(obj);
//
// talk_so.setProperty("msgList",arr);
//
}
private function convertArrayCollection(arrNew:ArrayCollection,arrOld:ArrayCollection):void
{
arrNew.removeAll();
for(var i:int=0;i<arrOld.length ;i++)
{
arrNew.addItemAt(arrOld.getItemAt(i),i);
}
}
private function talkSoSyncHandler(evt:SyncEvent):void
{
var tmp:ArrayCollection = new ArrayCollection();
msg.text="";
if ( talk_so.data.msgList!=null )
{
convertArrayCollection(tmp,talk_so.data.msgList as ArrayCollection);
for(var i:int=0;i<tmp.length ;i++)
{
var msg:Object = tmp.getItemAt(i);
var fullMsg:String=msg.nickname+"in"+msg.time.toTimeString()+"join:"+msg.msg;
msg.text=msg.text+fullMsg+"\n";
trace (fullMsg);
}
}
}
]]>
</fx:Script>
<s:VGroup>
<s:HGroup>
<s:VGroup width="33%">
<s:TextInput id="publish_address" text="rtmp://localhost/live">
</s:TextInput>
<s:TextInput id="shareObject_address" text="rtmp://localhost/room">
</s:TextInput>
<s:Button click="connection_clickHandler(event)" label="連接伺服器">
</s:Button >
<s:Button click="disconnection(event)" label="斷開伺服器">
</s:Button >
</s:VGroup>
<s:VGroup width="33%">
<s:TextInput id="publish_name" text="myCamera">
</s:TextInput>
<s:TextInput id="getback_name" text="myCamera2">
</s:TextInput>
<s:TextInput id="publish_type" text="live">
</s:TextInput>
<s:Button id="publish" click="publish_clickHandler(event)" label="推送數據流" >
</s:Button >
</s:VGroup>
<s:VGroup width="33%">
<s:TextInput id="shareObject_name" text="msgList">
</s:TextInput>
<s:TextInput id="shareObject_msg" text="test">
</s:TextInput>
<s:Button id="send_shareobject" click="send_shareobject_clickHandler(event)" label="發送訊息" >
</s:Button >
</s:VGroup>
</s:HGroup>
<s:HGroup>
<mx:Canvas id="canvas" height="{screen_h}" width="{screen_w}">
</mx:Canvas>
<mx:Canvas id="canvas2" height="{screen_h}" width="{screen_w}">
</mx:Canvas>
</s:HGroup>
<s:HGroup>
<s:TextInput id="msg" height="159" width="366">
</s:TextInput>
</s:HGroup>
</s:VGroup>
</s:Application>
view raw video.as hosted with ❤ by GitHub
防火牆設定


最重要!,連到伺服器外面端口,一定要把輸出輸入原則納編新增連接端口1935設為允許,
不同電腦之間連接,防火牆一定要設置,否則debug到爽。

shareObject


痾最後我不打算用shareObject,由於在性能上,適用共享去廣播參數,這會導致客戶端有無想接收訊息都會接受到廣播,第二個原因就是我弄到今天,在flash非同步的狀況下,fso檔案到底有沒有被寫入,原因可能就是上述,功力不夠?,綜合以上所已改用其他來開發

https://blog.csdn.net/wkyb608/article/details/5930823


上述算是未完成的程式碼懶得寫了,主要可以獲得該執行程式可以透過廣播的方式去傳遞,只要自行定義傳遞參數,把自己直播推流,和id傳遞過來基本再加一點邏輯判斷,一對多多對多,基本上都可以,視訊,監視器,直播阿應該都可以透過adobe media server實現,rtmp ,至於詬病https://blog.csdn.net/haima1998/article/details/78007123,速度方面可能改天再做一個p2p之間的傳輸,目前adobe media server 會自動轉為 rtmfp所以之前的癥結點沒囉,目前等公司提案再來考慮要不要搭建其他平台囉。


Friday, January 4, 2019

打造一個多人串流系統 adobe_media_server part1

打造一個多人串流系統


基本上伺服器用的是adobe media server 免費版開放連接數是10個為上限
然後程式碼的話,像在常見的環境,有的人可能不想裝flash,或者裝其他套件來播放,就以fb來說,假設可能要裝flash那時候可能就有可能一堆人都不要用了,當然有內建,現在是html5的時代,後續我會補上這功能。
就以稍微看一下目前的話
包括flash
adobe media server 後台


也就是
可以共同分享這個物件
打開document參考一下


程式碼


<?xml version="1.0" encoding="utf-8"?>
<s:Application xmlns:fx="http://ns.adobe.com/mxml/2009"
xmlns:s="library://ns.adobe.com/flex/spark"
xmlns:mx="library://ns.adobe.com/flex/mx"
creationComplete="windowedapplication1_creationCompleteHandler(event)">
<fx:Declarations>
<!-- Place non-visual elements (e.g., services, value objects) here -->
</fx:Declarations>
<fx:Script>
<![CDATA[
import flash.display.MovieClip;
import flash.events.NetStatusEvent;
import flash.media.Camera;
import flash.media.Microphone;
import flash.media.Video;
import flash.net.NetConnection;
import flash.net.NetStream;
import mx.core.UIComponent;
import mx.events.FlexEvent;
var nc:NetConnection;
var ns:NetStream;
var nsPlayer:NetStream;
var vid:Video;
var vidPlayer:Video;
var cam:Camera;
var mic:Microphone;
var screen_w:int=320;
var screen_h:int=240;
public function onBWDone():void {
trace("11");
}
public function simplest_as3_rtmp_streamer()
{
nc = new NetConnection();
nc.addEventListener(NetStatusEvent.NET_STATUS, onNetStatus);
nc.client ={ onBWDone: function():void{} };
nc.connect("rtmp://localhost/live");
}
private function onNetStatus(event:NetStatusEvent):void{
trace(event.info.code);
if(event.info.code == "NetConnection.Connect.Success"){
publishCamera();
displayPublishingVideo();
displayPlaybackVideo();
}
}
private function publishCamera() {
//Cam
cam = Camera.getCamera();
/**
* public function setMode(width:int, height:int, fps:Number, favorArea:Boolean = true):void
* width:int — The requested capture width, in pixels. The default value is 160.
* height:int — The requested capture height, in pixels. The default value is 120.
* fps:Number — The requested capture frame rate, in frames per second. The default value is 15.
*/
cam.setMode(640, 480,60);
/**
* public function setKeyFrameInterval(keyFrameInterval:int):void
* The number of video frames transmitted in full (called keyframes) instead of being interpolated by the video compression algorithm.
* The default value is 15, which means that every 15th frame is a keyframe. A value of 1 means that every frame is a keyframe.
* The allowed values are 1 through 300.
*/
cam.setKeyFrameInterval(60);
/**
* public function setQuality(bandwidth:int, quality:int):void
* bandwidth:int — Specifies the maximum amount of bandwidth that the current outgoing video feed can use, in bytes per second (bps).
* To specify that the video can use as much bandwidth as needed to maintain the value of quality, pass 0 for bandwidth.
* The default value is 16384.
* quality:int — An integer that specifies the required level of picture quality, as determined by the amount of compression
* being applied to each video frame. Acceptable values range from 1 (lowest quality, maximum compression) to 100
* (highest quality, no compression). To specify that picture quality can vary as needed to avoid exceeding bandwidth,
* pass 0 for quality.
*/
cam.setQuality(0,100);
/**
* public function setProfileLevel(profile:String, level:String):void
* Set profile and level for video encoding.
* Possible values for profile are H264Profile.BASELINE and H264Profile.MAIN. Default value is H264Profile.BASELINE.
* Other values are ignored and results in an error.
* Supported levels are 1, 1b, 1.1, 1.2, 1.3, 2, 2.1, 2.2, 3, 3.1, 3.2, 4, 4.1, 4.2, 5, and 5.1.
* Level may be increased if required by resolution and frame rate.
*/
//var h264setting:H264VideoStreamSettings = new H264VideoStreamSettings();
// h264setting.setProfileLevel(H264Profile.MAIN, 4);
//Mic
mic = Microphone.getMicrophone();
/*
* The encoded speech quality when using the Speex codec. Possible values are from 0 to 10. The default value is 6.
* Higher numbers represent higher quality but require more bandwidth, as shown in the following table.
* The bit rate values that are listed represent net bit rates and do not include packetization overhead.
* ------------------------------------------
* Quality value | Required bit rate (kbps)
*-------------------------------------------
* 0 | 3.95
* 1 | 5.75
* 2 | 7.75
* 3 | 9.80
* 4 | 12.8
* 5 | 16.8
* 6 | 20.6
* 7 | 23.8
* 8 | 27.8
* 9 | 34.2
* 10 | 42.2
*-------------------------------------------
*/
mic.encodeQuality = 9;
/* The rate at which the microphone is capturing sound, in kHz. Acceptable values are 5, 8, 11, 22, and 44. The default value is 8 kHz
* if your sound capture device supports this value. Otherwise, the default value is the next available capture level above 8 kHz that
* your sound capture device supports, usually 11 kHz.
*
*/
mic.rate = 44;
ns = new NetStream(nc);
//H.264 Setting
//ns.videoStreamSettings = h264setting;
ns.attachCamera(cam);
ns.attachAudio(mic);
ns.publish("myCamera", "live");
}
private function displayPublishingVideo():void {
vid = new Video(screen_w, screen_h);
vid.x = 10;
vid.y = 10;
vid.attachCamera(cam);
var tmp:UIComponent = new UIComponent();
tmp.addChild(vid);
canvas2.addElement(tmp);
}
private function displayPlaybackVideo():void{
nc.client ={ onBWDone: function():void{} };
nsPlayer = new NetStream(nc);
nsPlayer.bufferTime = 0.1;
nsPlayer.play("myCamera");
vidPlayer = new Video(screen_w, screen_h);
vidPlayer.x = screen_w + 20;
vidPlayer.y = 10;
vidPlayer.attachNetStream(nsPlayer);
var tmp:UIComponent = new UIComponent();
tmp.addChild(vidPlayer);
canvas.addElement(tmp);
}
protected function windowedapplication1_creationCompleteHandler(event:FlexEvent):void
{
// TODO Auto-generated method stub
nc = new NetConnection();
nc.addEventListener(NetStatusEvent.NET_STATUS, onNetStatus);
nc.connect("rtmp://localhost:1935/live");
nc.ad
}
]]>
</fx:Script>
<mx:Canvas id="canvas" x="12" y="22" width="255" height="207">
</mx:Canvas>
<mx:Canvas id="canvas2" x="50" y="22" width="255" height="207">
</mx:Canvas>
</s:Application>
view raw live.mxml hosted with ❤ by GitHub
程式碼大致上長這樣應該可以改了,
修改了大概考慮到控件的貼圖等等不考用慮用
addchild這個算比較舊的,所以改用
var tmp:UIComponent = new UIComponent();
tmp.addChild(vidPlayer);
canvas.addElement(tmp);

nc.client ={ onBWDone: function():void{} };
回調
再來就是最重要的
NetStream的buffertime=0.1;
這關係到畫面上的抖動,在開刀的時候很重要呢,不過痾,缺點就是會延遲
到時候公司的伺服器可能又要升級了,
再者就是
目前使用flash去開發
因為考慮到跨平台
所以在打造一個多人的系統呢我打算用裡面的shareobject

編譯


目前使用的程式碼可以通用於執行檔和web網頁,因為底層都是flash所以只要能載入flash基本上可以達到跨平台的效果,然後flash真的是我用過最舊的東西,可能我是目光太淺,痾在build web application的時候
請注意

太舊了,這點下去會開啟ie,在windows10的時候把預設瀏覽器設為chrome,他直接沒反應,裝完的時候,這才是問題的第一步,我們請看下一步

執行


能編譯還不算還要伺服器,這邊呢因為考慮到測試,目前用xampp來架設伺服器
端口會跟flash media server 的後台互衝,所以我們的伺服器換個端口8080
有可能要離線設置或著flash player 權限問題


有可能要來這裡新增一下把網站的swf都加入

執行part2


直接執行的話,還是會跳出錯誤訊息,然後跳出一個ie,然後就沒有然後了,這個時候會卡在50%,
可能是windows 預設瀏覽器裡面就有裝adobe不過那裏面沒有debug plugin之類的,所以flash buileder會卡在那邊等deubg工具回應,不過沒關係我們在編譯的那邊已經裝了,chrome的debug工具,所以現在我們貼上網址去chrome瀏覽器


成功可以debug囉

畫面


初期架構


做個小筆記,初期架構額到時可能每個人都有一個獨立app也就是獨自的rtmp,那麼,架設多人視訊的話,會去讀房間的shareobject假設要撥放的話,假設其他客戶端連線的話也代表它們也有rtmp,初步設定他們的名稱就是,rtmp的網址
那麼我只要在shareobject裡面master一定是第一個放主畫面,自己的url略過這樣的話就算
初步實現多人會議了,痾就這麼簡單,要實作一個直播平台,youtube串流也可以不過協定應該不會使用rtmp,當然在伺服器分流也要做好處理,網速當然是重點,cpu解碼速度不知道有沒有用這可能就要深入探討,下回揭曉沒意外應該會寫sharobject應用到實際


參考

Wednesday, January 2, 2019

又有新工作了,還是要熬夜組模型

上班到一半,被通知要我研究一下醫生開刀視訊系統,難道要我這新人扛起這麼大責任嗎,繼續看下去~ 60塊夾到野源廣志,酷

次主角登場!


https://youtu.be/l-kIeMNBDfE
我妹說我是野源廣志真人版ㄏㄏ,兩津勘吉吧


主角登場!


完成品,隔壁加開!,這股力量有要成為大賢者的感覺!